Why do dogs adore a multi squeaker dog toy? Discover the simple reason for endless fun!
Okay, so I got this idea the other day. My dog, bless his heart, goes through squeaky toys like nobody's business. One squeaker? That's like five minutes of fun, tops, before it's silenced forever. I thought, what if I made something with multiple squeakers? More targets, maybe it'll last longer, right? Seemed like a fun little project anyway.
Getting Started - The Hunt for Bits and Pieces
First thing, I needed supplies. Didn't want to spend a fortune, so I went rummaging.
- Fabric: Found some old, thick canvas drop cloth I wasn't using. Figured that'd be tougher than the usual flimsy stuff they use in store-bought toys. Could also use old jeans, I guess.
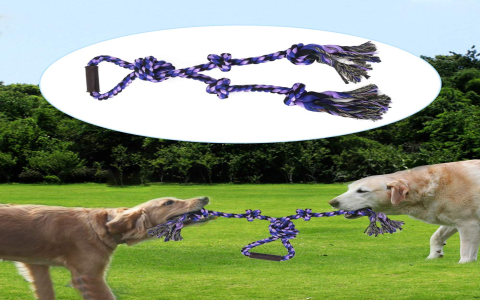
- Squeakers: This was key. I actually had a few saved from toys my dog had already, uh, dissected. Washed 'em out. Also bought a cheap pack of replacement squeakers online a while back, knew they'd come in handy. Needed a bunch for this.
- Thread: Grabbed some heavy-duty thread. Normal stuff wouldn't stand a chance.
- Needles/Machine: Decided to use my sewing machine for the main seams, but kept a sturdy needle for hand-stitching the final bit.
- Scissors: Obvious, yeah?
- Stuffing: Debated this. Decided against too much stuffing, wanted the squeakers to be the main event. Used just a tiny bit from an old pillow to give it some shape.
Making the Thing
Right, got my stuff. I decided on a simple, long-ish shape. Kinda like a lumpy sausage, easy to grab and shake.
I laid the canvas out, folded it over, and drew my sausage shape. Cut through both layers so I had two identical pieces. Pretty straightforward.
Then, I pinned the two pieces together, right sides facing inwards. Took it over to the sewing machine. I stitched almost all the way around the edge, using a strong stitch. Left a decent-sized gap on one side – gotta have a way to get the squeakers in.
Next, I turned the whole thing right-side out through the gap. Poked out the corners (or curves, in my sausage case) so it looked okay. Now for the fun part.
I started stuffing the squeakers in. Placed maybe five or six of them along the length, pushing them into different spots. Added just a little bit of that pillow stuffing here and there to fill the gaps and stop the squeakers from just rattling around loosely against each other. Didn't pack it tight, though.
Finishing Touches and The Big Test
Okay, everything's inside. Now, the slightly tricky bit: closing the gap. I folded the raw edges of the opening inwards neatly. Then, I grabbed my sturdy needle and the heavy-duty thread. Did a really tight, small hand stitch to close that hole up. Went over it twice, maybe three times, just to be sure. Didn't want squeakers making an early escape.
And... done! It looked a bit rough, not gonna lie. My sewing isn't exactly professional grade. But it felt solid, and shaking it made a satisfying multi-squeak noise.
Called the dog over. Showed him the new toy. His ears perked right up. Gave it a toss. He pounced! Sniffed it, bit it, squeak-squeak-squeak! He seemed genuinely confused and excited that biting anywhere produced a noise. He started thrashing it around, totally into it.
So far, it's holding up better than the usual toys. It's been a few days, and all squeakers are still operational. Success! It wasn't too hard, used up some old stuff, and the dog loves it. Might make another one, maybe try a different shape next time.