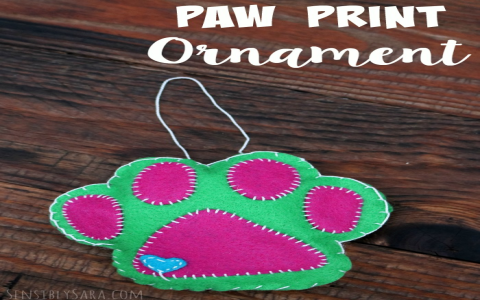
Make a Dog Foot Print Ornament: Easy DIY Guide
Alright, folks, gather 'round! Today, I'm spilling the beans on a little project I tackled recently: DIY dog footprint ornaments. Trust me, it's easier than you think, and the result? Absolutely paw-some!

So, it all started when I was browsing Pinterest (as one does) and stumbled upon a bunch of cute paw print ornament ideas. I figured, why not give it a shot? My furry pal deserves some holiday love, right?
Step 1: Gather Your Supplies
- Air-dry clay (I grabbed a big ol' block from the craft store)
- Rolling pin (or a smooth, cylindrical object – a wine bottle works in a pinch!)
- Cookie cutters (I used a classic circle, but a bone shape would be adorable!)
- Drinking straw (for making the hole for the ribbon)
- Acrylic paints (non-toxic, of course!)
- Paintbrushes
- Ribbon or twine
- Optional: Glitter (because why not?)
Step 2: Prep the Clay
First, I kneaded the clay until it was nice and soft. This is important – you don't want any cracks in your ornament later. Then, I plopped it down on a piece of parchment paper and started rolling it out. Aim for about ¼ inch thickness. Too thin, and it'll be fragile; too thick, and it'll take forever to dry.
Step 3: Paw Print Time!
Okay, this is where things get a little tricky. Getting a dog to cooperate is... well, it's an experience. I bribed my pup with treats (lots of 'em!). Gently press your dog's paw into the clay. Don't push too hard, just enough to make a clear impression. Clean the paw immediately afterward!
Step 4: Cut and Create
Using your cookie cutter, carefully cut out the paw print shape. Then, use the straw to make a hole near the top for hanging. Don't make it too close to the edge, or it might break later.

Step 5: Drying Time
Place the ornaments on a flat surface covered with parchment paper and let them air dry. This can take anywhere from 24 to 72 hours, depending on the thickness of the clay and the humidity. Be patient!
Step 6: Painting and Decorating
Once the ornaments are completely dry, it's time to get creative! I painted the paw prints with white acrylic paint and then added a little bit of gold glitter around the edges for a festive touch. You can use any colors you like, and feel free to personalize them with your dog's name or a cute design.
Step 7: Finishing Touches
Thread a ribbon or twine through the hole and tie it in a knot. And that's it! Your adorable dog footprint ornament is ready to hang on the tree.
My Lessons Learned:
- Treats are your best friend: Seriously, stock up.
- Be patient: Clay takes time to dry properly. Don't rush it.
- Embrace imperfections: These are handmade, after all! A little imperfection just adds character.
Overall, this was a fun and easy project, and the finished ornaments are something I'll treasure for years to come. Plus, my dog got extra treats, so win-win! Give it a try – you won't regret it!