Window Guards for Dogs: Prevent Accidents & Escapes!
Okay, here's my blog post about installing window guards for my dogs, written in a casual, personal style:
So, I've got these two crazy pups, a Golden Retriever named Max and a little terrier mix, Lucy. They love looking out the windows, barking at squirrels, the mailman, you name it. But I live on the second floor, and I was always a little paranoid they'd get too excited and, you know, fall out. I mean, screens are okay, but they're not exactly Fort Knox, right?
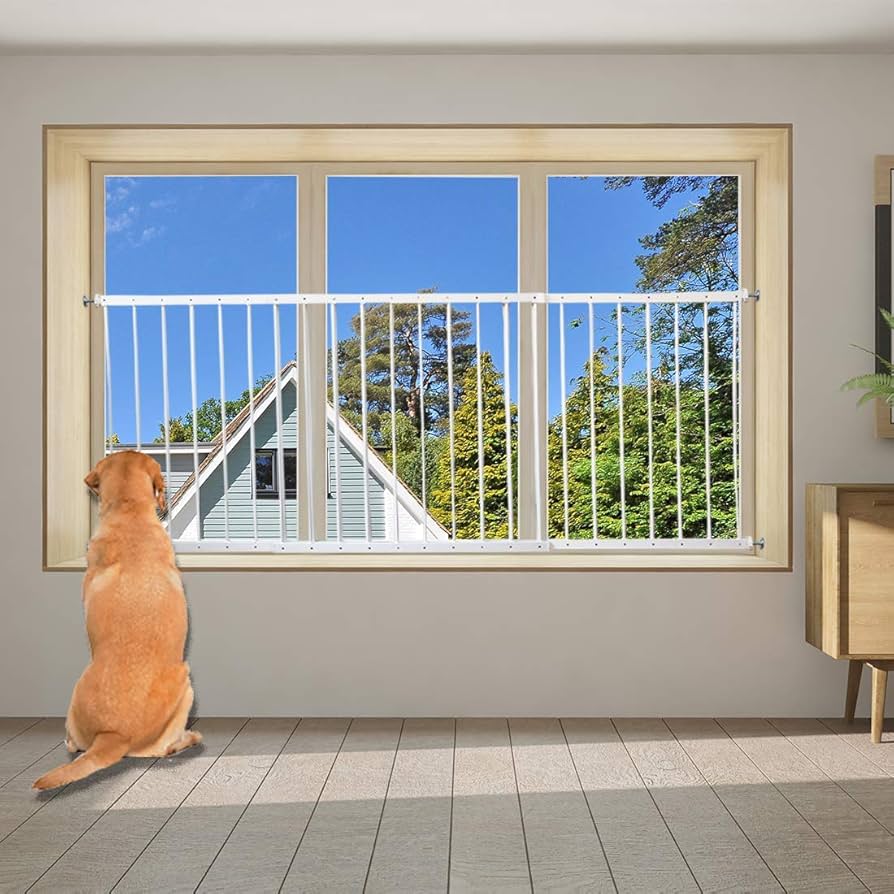
I started looking into window guards. I'd seen them around the neighborhood, those metal bars that go across the windows. Seemed like a good solution, but I had no idea where to even start.
Figuring Out What I Needed
First thing I did was measure all my windows. I've got a mix of sizes – some big picture windows in the living room and smaller ones in the bedrooms. I grabbed a tape measure and jotted down the width and height of each one, making sure to measure the inside of the window frame, where the guards would actually sit.
Then came the fun part – choosing the guards! I did a quick look and holy moly, there are a ton of options. Different styles, different materials, different ways to install them. I felt a little overwhelmed, not gonna lie.
I knew I wanted something sturdy, obviously. Metal seemed like the best bet. I also wanted something that wouldn't look totally hideous. I mean, I love my dogs, but I don't want my apartment to look like a prison cell.
- Adjustable vs. Fixed: Some guards are adjustable, meaning they can fit a range of window sizes. Others are fixed, so you need to get the exact size. I went with adjustable, just to be safe.
- Pressure-Mounted vs. Screw-In: Some guards are held in place with pressure, like a tension rod. Others you actually screw into the window frame.I ended up grabbing some that you screw in because my dogs are a little wild.
The Installation Process (aka My Saturday Afternoon)
Okay, so the guards arrived. I unpacked everything, laid it all out, and…stared at it for a good five minutes. The instructions looked a little intimidating, but I figured, "How hard can it be?" (Famous last words, right?)
I started with one of the smaller bedroom windows, just in case I messed things up. I grabbed my screwdriver and a drill, and the install on the smaller window was a breeze. It took a little figuring out, but all good.
The living room windows, though…those were a different story. They're much wider, and getting the guards to fit snugly was a bit of a pain. I had to adjust them a few times, and I definitely muttered a few curse words under my breath. But eventually, I got them in!

The Final Result (and the Dogs' Reaction)
All in all, it took me a couple of hours to get all the guards installed. My arms were a little sore, but it was worth it. Now, Max and Lucy can hang out by the windows all they want, and I don't have to worry about them taking an unexpected tumble.
They seem pretty happy with the new setup, too. They still bark at everything that moves, but now they do it with a little extra security. And honestly, that peace of mind is priceless.
If you have been thinking about doing the same project, I hope my experience helps you out. Good luck!